Overview
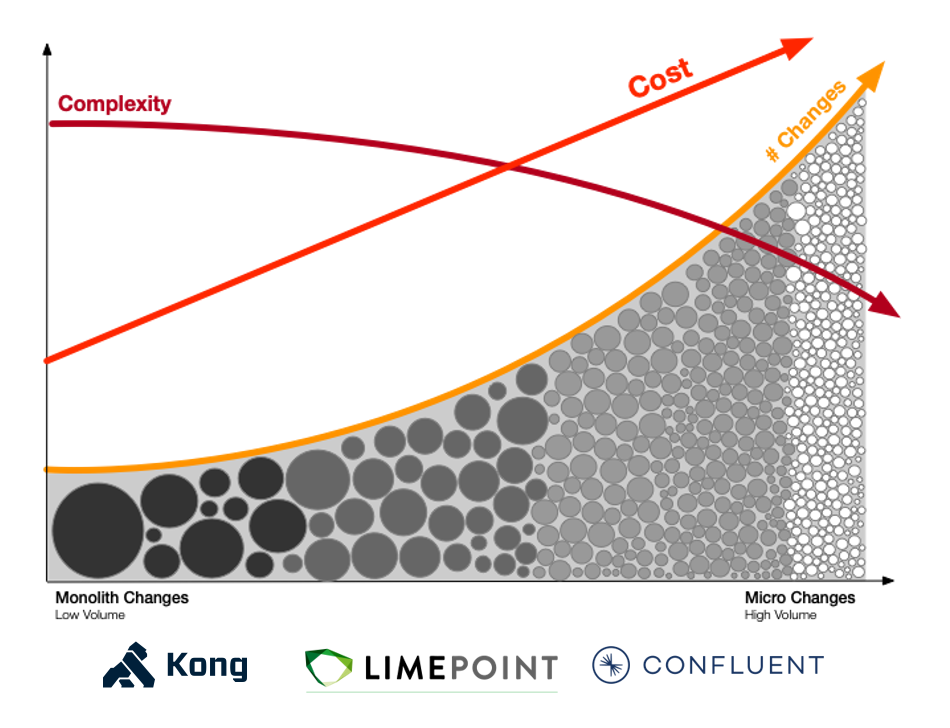
Since the advent of microservices and separation of concerns at the infra level, how applications communicate internally and externally has changed greatly. A service mesh simplifies the management of connectivity of services. Normally application components communicate directly. An app tier machine will connect to the data layer directly, a cache in the data layer might directly access a read replica DB and of course an app-tier machine writing data will probably directly connect to the write-master DB. Cool and normal, but what happens when we scale out these layers widely or introduce microservices for certain tasks, the management of endpoints and ports doesn’t scale well if we don’t have a means of mapping and monitoring those connections.
A service mesh simplifies the management of connectivity for an application by abstracting those classes of connections into groups known as a dataplane. So grouped, the dataplane is now subject to various new capabilities for managing traffic for the dataplane, such as health checking, load balancing, splitting traffic for canary or A-B testing, logging, security management and so on. All of those tasks that were manually managed, and subject to manual rebuild for application changes can now be dealt with in the dataplane.
Simple mesh example
For this article I will set up the Kuma service mesh from Kong in universal mode. I will use their install instructions modified as much as needed for to launch Kuma using an EC2 launch template and a simple userdata script to install and configure Kuma. According to that example the goal is to create the kuma control-plane, a dataplane to sit in front of a simple service, also provided with Kuma, that being a simple echo service. Finally we will connect through the dataplane over the port set in the dataplane, which routes the traffic to the actual service port configured in the example.
The Kuma documentation is available at: https://kuma.io/docs/0.4.0/overview/what-is-kuma/
I will be using the CentOS installation example for my launch template: https://kuma.io/docs/0.4.0/installation/centos/
Launch template and Userdata.sh
EC2 allows us to set up templates of machine specifications, subnets, tags which we can use to quickly launch one or more EC2 instances. A very handy tool in the launch template system is the ability to include the userdata shell script. This script runs as root during boot and lets us update and configure things on the fly. My adaptation of the centos installation is mostly the same as the documentation with these exceptions:
- The package managed runs update and also installs a few handy tools (jq, tree, etc)
- A dir called kuma is created at / and the tar file is copied there and expanded
- Full paths are used to call kuma commands and importantly, these calls are backgrounded (&) as the calls did not return
- The script contains a smattering of sleeps to allow the bg commands to complete
- mTLS for the dataplane is set to false for simplicity
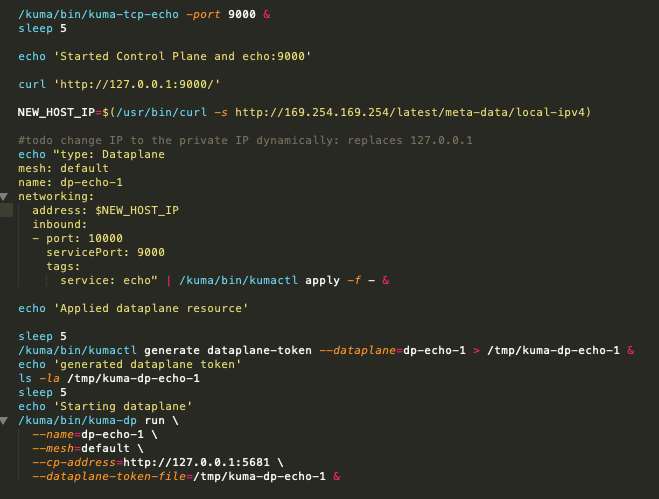
Having sorted all of that out, and installed the final version of the userdata script to EC2 Launch Templates, I am able to launch a preconfigured instance and set up Kuma in one shot. This setup is extremely fast. By the time I click around to get the public IP, Kuma is already configured and running.
Kuma GUI
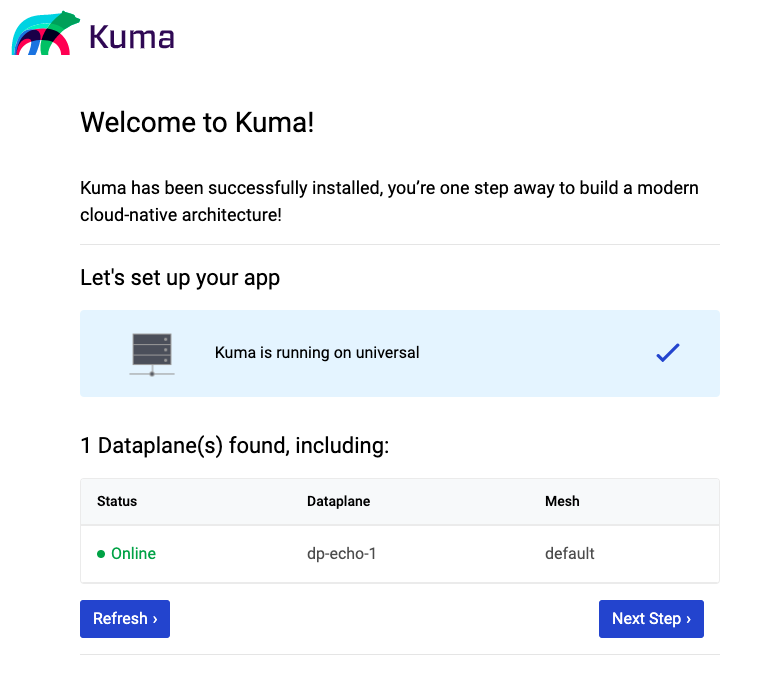
The UI is available on port:5683.
On the friendly welcome page, we can see some of the elements from the install materials and or the userdata script.
Kuma has two modes out of the box, Universal and Kubernetes. The built in self test has detected we are using the Universal mode.
It has found our dataplane, dp-echo-1, for the example echo service, and that this is registered with the mesh named ‘default’. We click ‘next’ for more friendly messages and a list of things we can configure such as routing, security, tracing and logging.
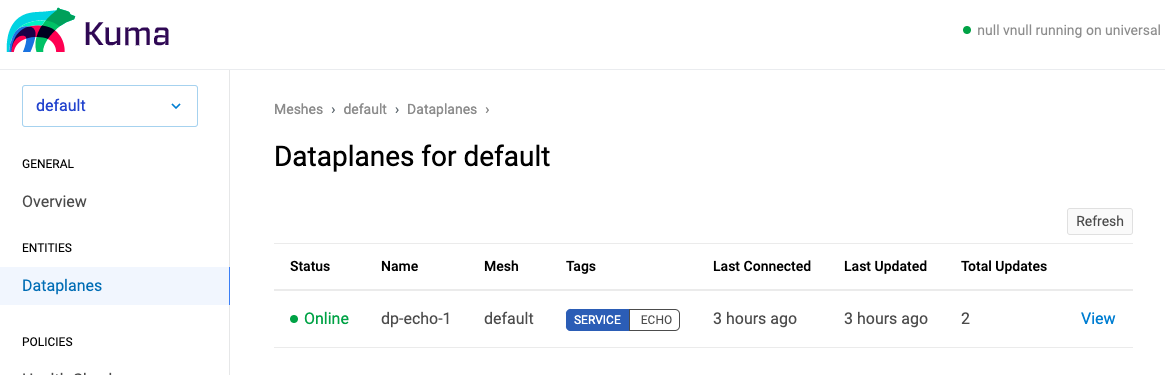
Clicking through to the Dashboard there is a UI summary of what Kuma is currently managing. Let’s look specifically at the dataplane page:
So let’s now check that the dataplane is doing what we need, for that I need to ssh to the EC2 instance and check:
- Kuma folder contains the binaries we need
- The supplied echo port 9000 is answering to hails
- The configured dataplane port will seamlessly give us the same functionality
In the machine we can use tree to check the files:
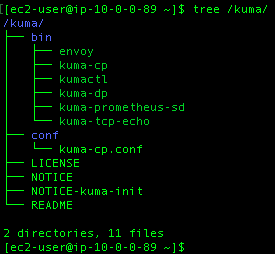
And that the service binary is present: kuma-tcp-echo, which is present and correct.
Now we check that service is listening as per it being started in the userdata script, then confirm we can use the different port.
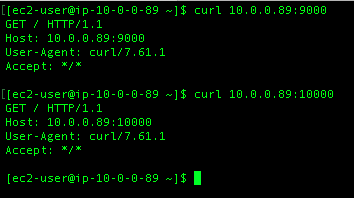
And yes, we can use the service as well as connect to it through the dataplane.
Getting real
It is unlikely we would ever have a control plane and a dataplane running on the same instance or container, so let’s set up something which is more realistic and create two dataplanes for external services run by the control plane on our example instance.
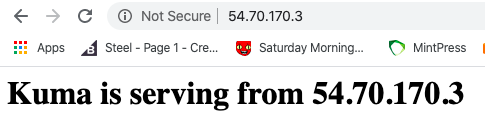
For simplicity I will configure two apache webservers in separate instances each with dataplanes running. This architecture is referred to as a ‘sidecar proxy’ where there is either a second container which has the proxy, or in this case the proxy is running in the same instance alongside the service. The intent is that we can make GET requests to the dataplane, at which time the control plane will route traffic to either of the webservers. Our tests will read a page which shows the IP address of the server.
A new template is made for launching webserver machines:
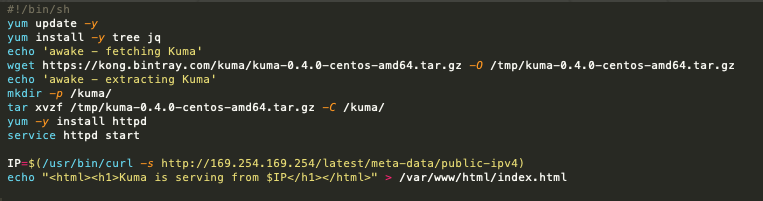
Here we get the kuma binaries, install and run a web server, and give it a simple index.html to serve with the machine’s IP address.
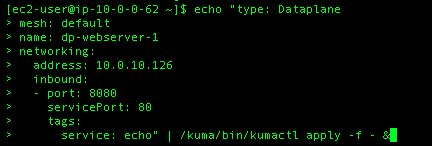
Now we need to tell the control plane about the new dataplane and create the dataplane entity on the control plane instance.
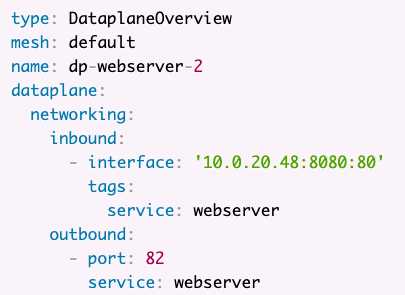
So I will setup port 8080 on the dataplane to serve traffic from port 80 on the webserver machine.
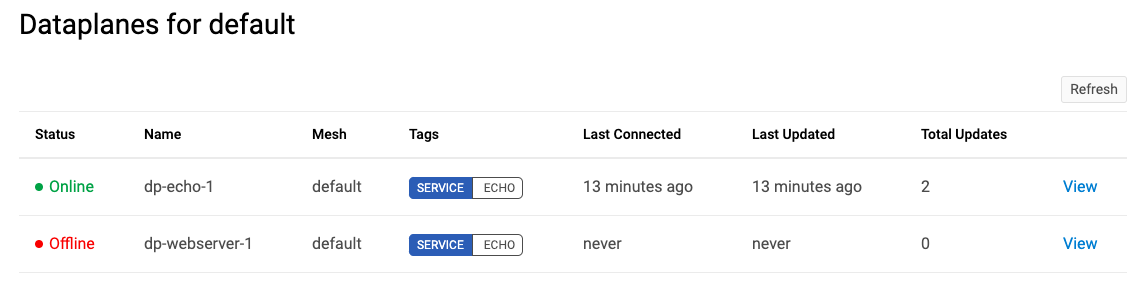
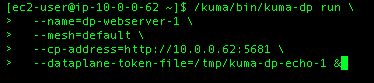
Now we need to run the dataplane on the webserver machine to bring it to the ‘online’ state.
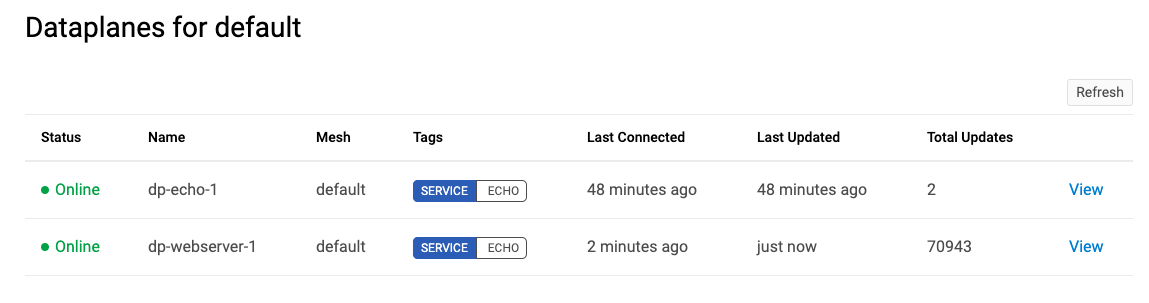
Now when we return to the GUI dataplane panel we can see that the dataplane is now in the ‘online’ state.
One node does not a ‘mesh’ make…
The webserver node is up and is serving its content from its default port 80 to the dataplane on port 8080.
Let’s clean up a bit and remove the echo service and add one more webserver to the webserver dataplane.
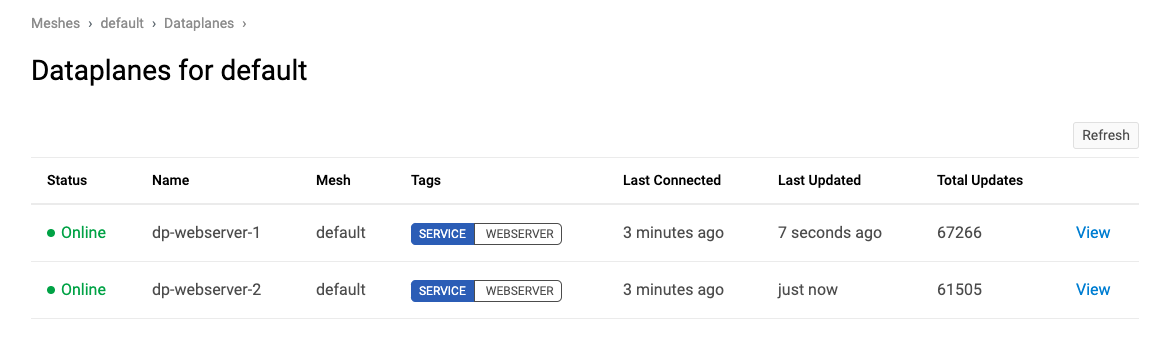
Now we have two webserver machines running, each are members of the WEBSERVER service in the default mesh. Both machines accept traffic on port 8080 which the dataplane routes to port 80 locally. The dataplane is configured to send requests on port 82 out to the WEBSERVER service using the ‘outbound’ configuration setting.
The final check is to login to a webserver machine and check that Kuma is routing as per our configuration.
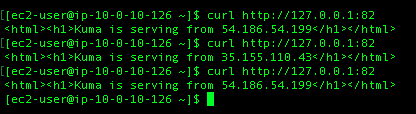
Here I am making calls to the local proxy on port 82, those calls are routed across the dataplane to the machines making up the WEBSERVER service. Each machine is responding in turn as the control plane distributes the traffic in the dataplane.
Conclusion
As distributed systems become more complex, managing connectivity, security and redundancy becomes more complex. A service mesh gives infrastructure teams a powerful tool to manage that complexity and the risk that comes with it. A service mesh can be used to remove single point of failure weaknesses such as load-balancers by taking on that function and simplifying the overall topology. A service mesh can provide much greater detail on network traffic and loads on various parts of the system. Security is enhanced using a service mesh by encrypting all traffic with TLS, and teams have new tools for enforcing access control using policies in the control plane.
Kuma is relatively new on the service mesh scene and is improving daily. I used the universal mode for Kuma which is a very manual process. A lot of work is going into using Kuma with Kubernetes. Thankfully the k8 mode is largely automatic and should probably be your first port of call should you wish to try it out.