Overview
For companies who are existing clients of LimePoint, installing DriftGuard in the AWS Cloud can be quite a simple exercise. New clients can also follow this procedure of course, once access to releases and licensing has been sorted.
The process involves provisioning an EC2 instance and an RDS instance to host the application and database respectively, with some additional AWS components required to look after connectivity. The steps can be undertaken by any sys admin, but prior experience with AWS is going to make the exercise a lot easier. Requirements include access to an AWS account (with permissions to create and manage EC2 and RDS components), as well as the aforementioned access to DriftGuard releases, and a valid licence.
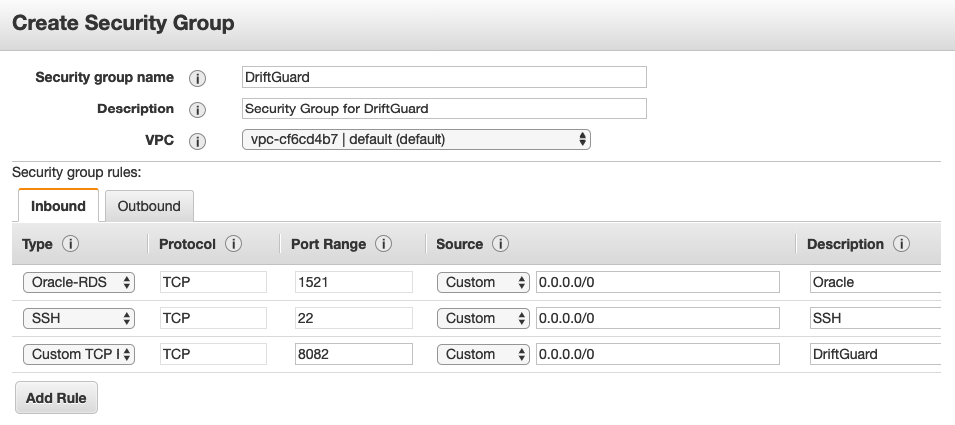
It should be noted that the Security Group in this example has deliberately been configured to be open to any IP, but in secure environment this should be locked down appropriately. For simplicity the database passwords specified in the User Data section are also all set to the string ‘password’ – these should be changed appropriately as well.
The high-level steps are as follows:
- Create Security Group
- Create RDS
- Create Keypair
- Create EC2
- Create Elastic IP
- Download DriftGuard Software
- Install DriftGuard Software
Create Security Group
- Navigate to the EC2 Dashboard console
- On the left, under ‘Network & Security’, click ‘Security Groups’
- Click ‘Create Security Group’
- Enter ‘Security Group Name’ as “DriftGuard”
- Enter ‘Description’
- Select the ‘Default VPC’ from the drop-down
- Click Add Rule Three times
- Populate the first rule for Oracle-RDS on port 1521 from 0.0.0.0/0
- Populate the second rule for SSH on port 22 from 0.0.0.0/0
- Populate the third rule for Custom TCP on port 8082 from 0.0.0.0/0
Create RDS
- Navigate to the RDS Dashboard console
- Click ‘Create database’
- Database creation method: leave ‘Standard Create’ selected
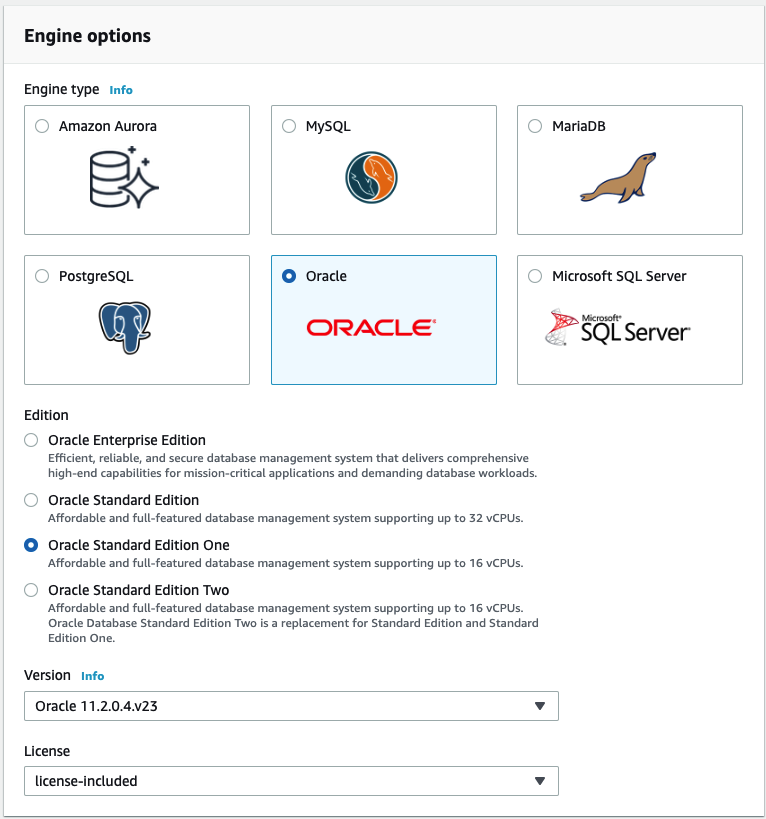
- Engine Options:
- ‘Oracle’
- ‘Oracle Standard Edition One’
- ‘license-included’

- Templates: select ‘Dev/Test’
- Settings:
- change DB Instance Identifier to “DriftGuard”
- Enter and confirm Master password as “password”
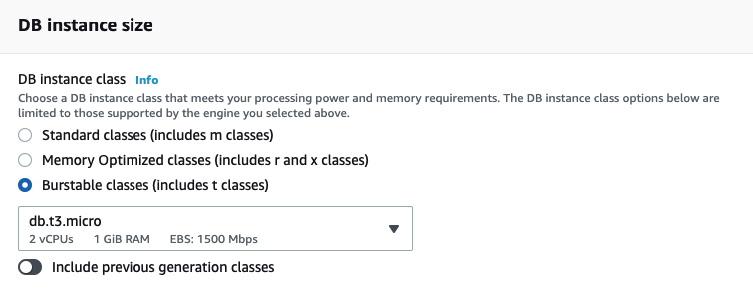
- DB instance size:
- ‘Burstable classes’
- ‘db.t3.micro’

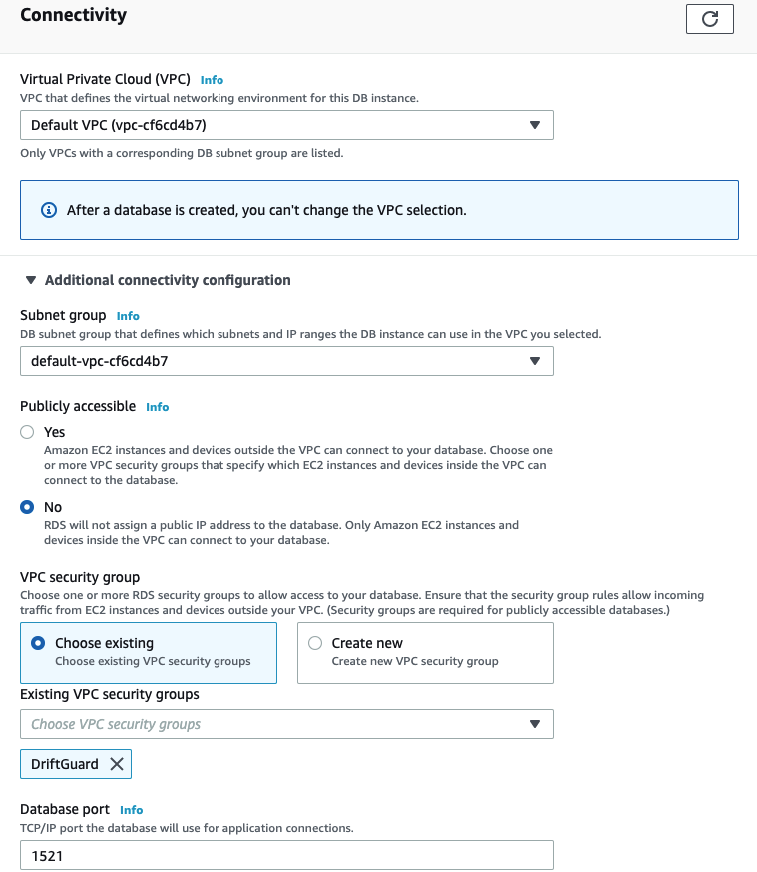
- Connectivity:
- Default VPC
- Expand ‘Additional connectivity’ and set the ‘VPC security group’ to the ‘DriftGuard’ group created earlier
- Additional configuration:
- Set Initial database name as “dg”
- Scroll to bottom and click ‘Create Database’
- While the database is creating, you can move on with the next steps
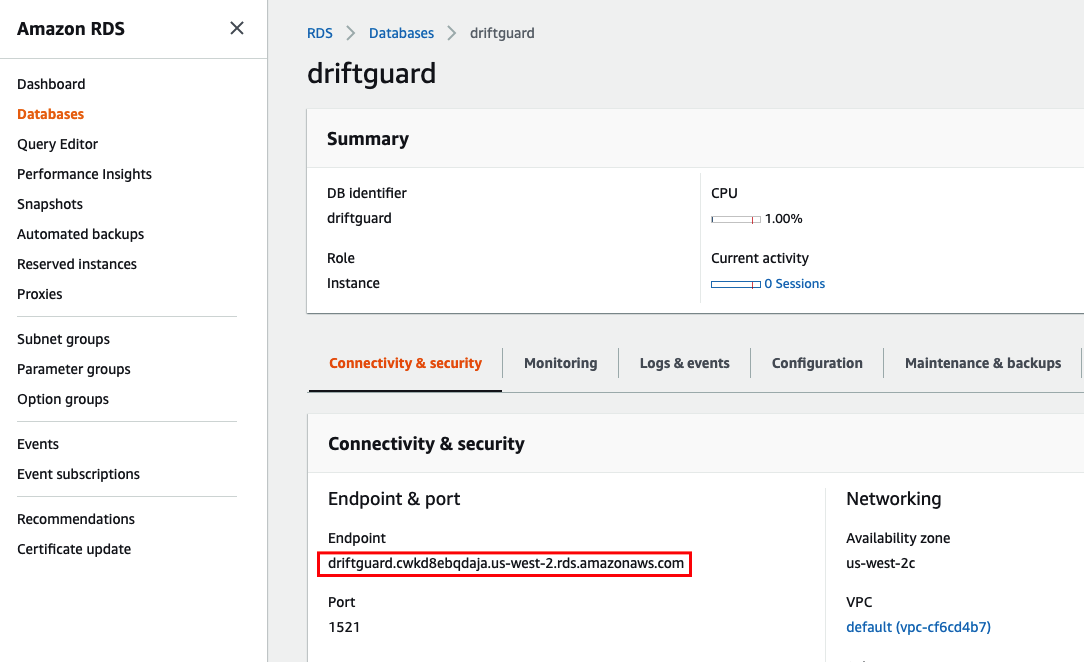
- Once the database has finished being created, navigate to the ‘Connectivity & security’ section, and make note of the ‘Endpoint’
Create Keypair
- Navigate to the EC2 Dashboard console
- On the left, under ‘Network and Security’, click ‘Key Pairs’
- Click ‘Create key pair’
- Enter key pair name “dg” – leave “pem” selected
- Click ‘Create key pair’
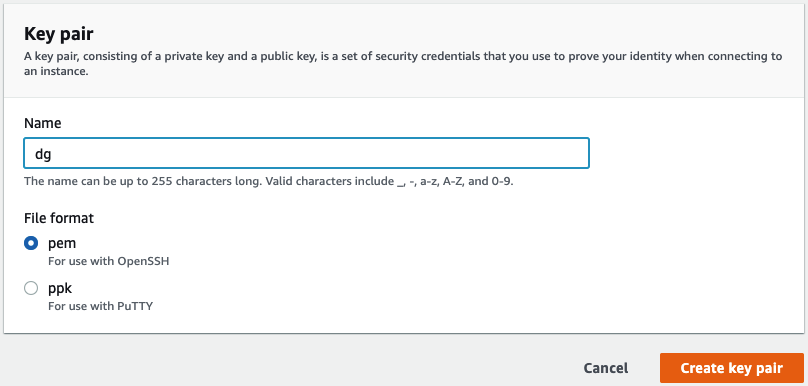
- From the dialog box that appears, save the key pair to your workstation
- Depending on the OS of your workstation, you may need to set permissions on the file to 0400
Create EC2
- Navigate to the EC2 Dashboard console
- Click Launch Instance
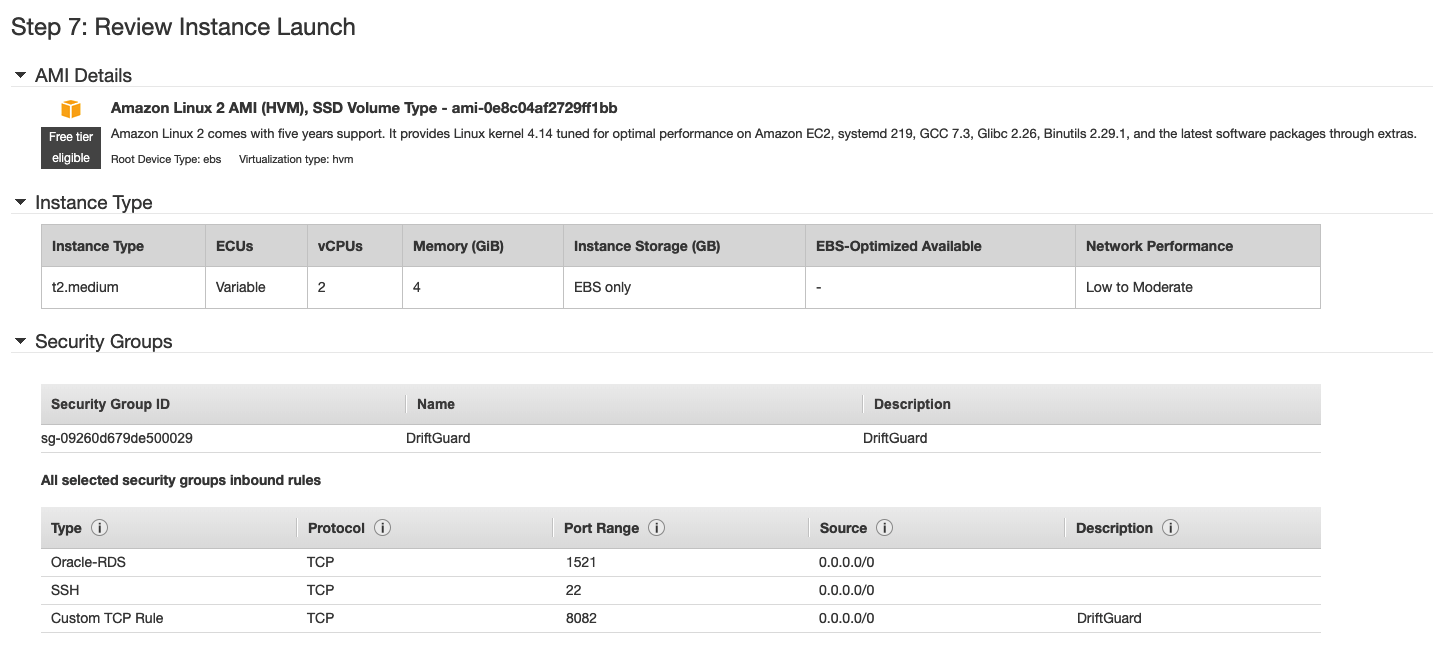
- Select ‘Amazon Linux 2 AMI (HVM), SSD Volume Type – ami-0e8c04af2729ff1bb (64-bit x86)’
- Select t2.medium and click ‘Next: Configure Instance Details’
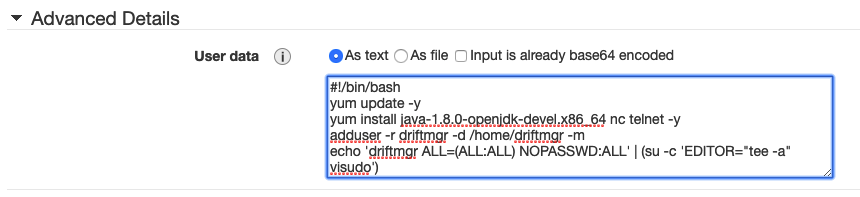
- In the ‘User Data’ field (bottom of screen), enter the following:
#!/bin/bash
yum update -y
yum install java-1.8.0-openjdk-devel.x86_64 nc telnet -y
adduser -r driftmgr -d /home/driftmgr -m
echo 'driftmgr ALL=(ALL:ALL) NOPASSWD:ALL' | (su -c 'EDITOR="tee -a" visudo')
echo 'export JAVA_HOME=/etc/alternatives/java_sdk' >> /home/driftmgr/.bash_profile
mkdir -p /limepoint/product
chown -R driftmgr:driftmgr /limepoint
cat <<'EOF' >> /home/driftmgr/driftguard.rsp
# DriftGuard Installer Response File
rsp_rootdir='/limepoint/product/drift'
rsp_driftcontextroot=/drift
rsp_drifthttpport=8082
rsp_drifthttpsport=8443
rsp_driftajpport=8081
rsp_driftserverport=8107
rsp_driftlistenaddress='*'
rsp_driftdbhost='DB_URL'
rsp_driftdbport='1521'
rsp_driftdbconnecttype='1'
rsp_driftdbsid='dg'
rsp_driftdburl='jdbc:oracle:thin:@(DESCRIPTION=(ADDRESS=(PROTOCOL=TCP)(HOST=DB_URL)(PORT=1521))(CONNECT_DATA=(SERVICE_NAME=dg)))'
rsp_driftschemaprefix=''
rsp_driftdbpassword='password'
rsp_driftrodbpassword='password'
rsp_configdb='y'
rsp_driftdbsysusername='admin'
rsp_driftdbsyspassword='password'
rsp_driftsecdbpassword='password'
rsp_driftdatafileprefix=''
rsp_configldap='n'
rsp_roleAdmin='RoleAdmin'
rsp_roleDriftAdmin='RoleDriftAdmin'
rsp_roleDriftCollector='RoleDriftCollector'
rsp_roleDriftDeveloper='RoleDriftDeveloper'
rsp_roleDriftViewer='RoleDriftViewer'
rsp_importLdapCertificate='n'
rsp_ignoreCertImportWarnings='y'
EOF
chown driftmgr:driftmgr /home/driftmgr/driftguard.rsp
- Click ‘Next:Add Storage’
- Click ‘Next:Add Tags’
- Click ‘Add Tag’ and enter a Key of “Name” and a Value of “DriftGuard”
- Click ‘Next:Configure Security Group’
- Click ‘Select an existing security group’ and choose the “DriftGuard” group
- Click Review and Launch
- Click Launch
- Click Choose an existing key pair and select the “dg” pair
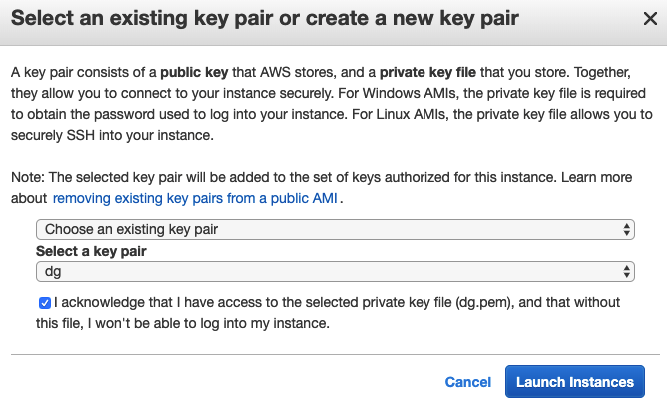
- Click Launch Instance
Create Elastic IP
- Navigate to the EC2 Dashboard console
- On the left, under Network & Security, click Elastic IPs
- Click ‘Allocate Elastic IP address’
- Leave current settings and click Allocate
- Make a note of the Public IPv4 address that was allocated
- Select the row, click Actions and select Associate Elastic IP address
- From the Instance drop-down, select the DriftGuard instance
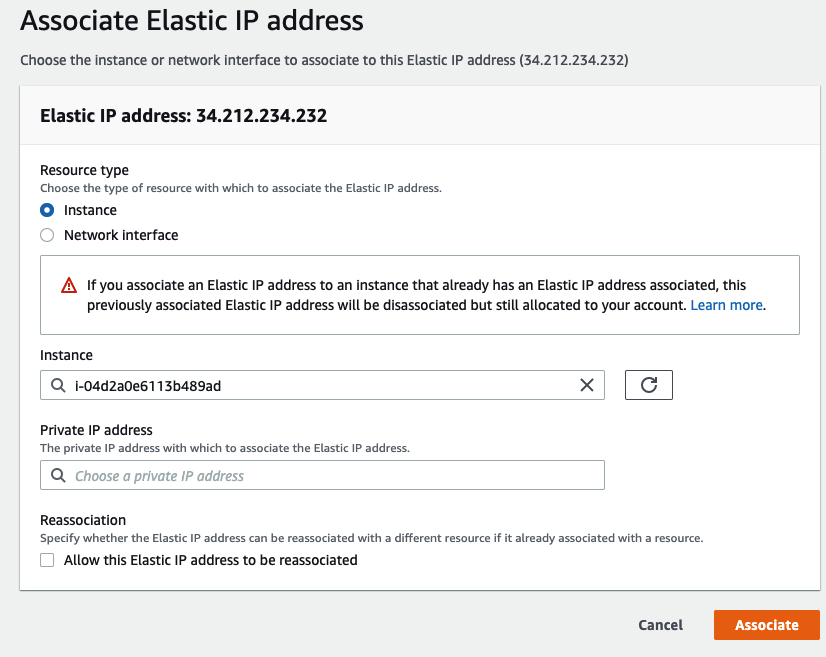
- Click Associate
Download DriftGuard Software
- Navigate to https://releases.driftguard.io/ (note: this will require login credentials)
- Click Download current release
- Using the Elastic IP and key pair created earlier, sftp the DriftGuard-Installer.sh file to the /tmp directory on the DriftGuard server at the Elastic IP address obtained above
Install DriftGuard Software
- Using the Elastic IP and key pair created earlier, ssh to the DriftGuard server
- Switch to the ‘driftmgr’ user via sudo su
- Copy the DriftGuard-Installer.sh file from the /tmp dir
- Change permissions on the file: chmod 755 DriftGuard-Installer.sh
- Update the driftguard.rsp file with the correct RDS endpoint:
sed -i ‘s/DB_URL/<endpoint>/’ driftguard.rsp
e.g.
sed -i 's/DB_URL/driftguard.cwkd8ebqdaja.us-west-2.rds.amazonaws.com/' driftguard.rsp
- Run the Installer: ./DriftGuard-Installer.sh driftguard.rsp
- Once the installer is done, a message similar to the following will show in the terminal:
Warming the application
DriftGuard running.  Browse http://localhost:8082/drift admin/password, drift/password, (all other seeded users also have a password of password).
Log in
- Navigate to http://<ip-address>:8082/drift in the browser, where <ip-address> is the Elastic IP created earlier
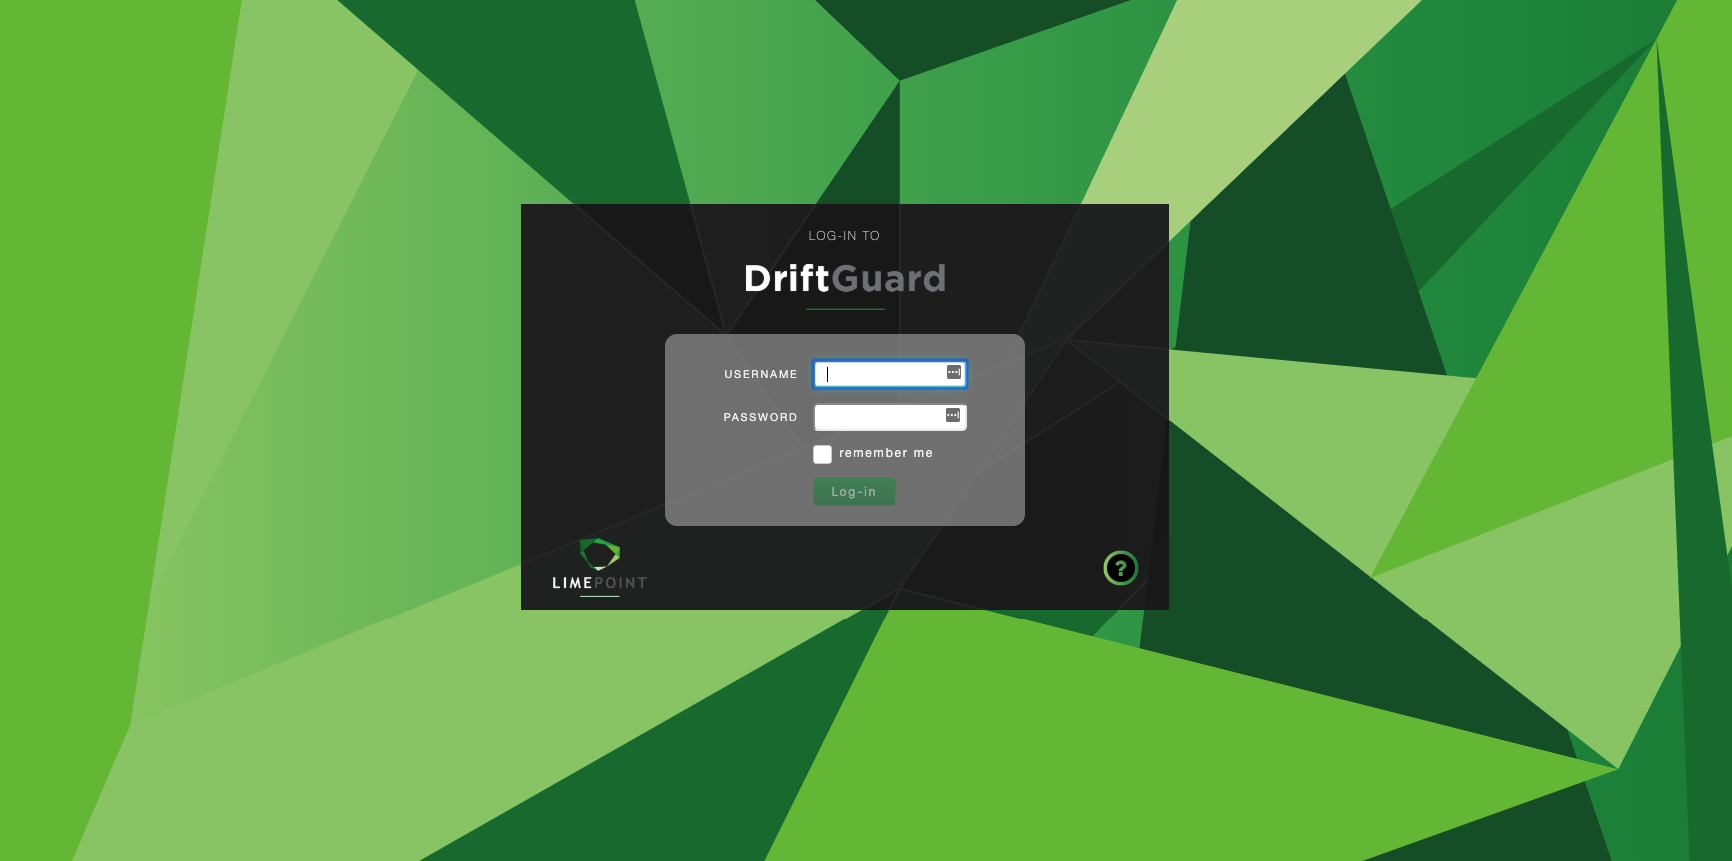
- Use the credentials drift / password to log in, at which point you will see a valid licence is not installed (a valid licence must be purchased from LimePoint)

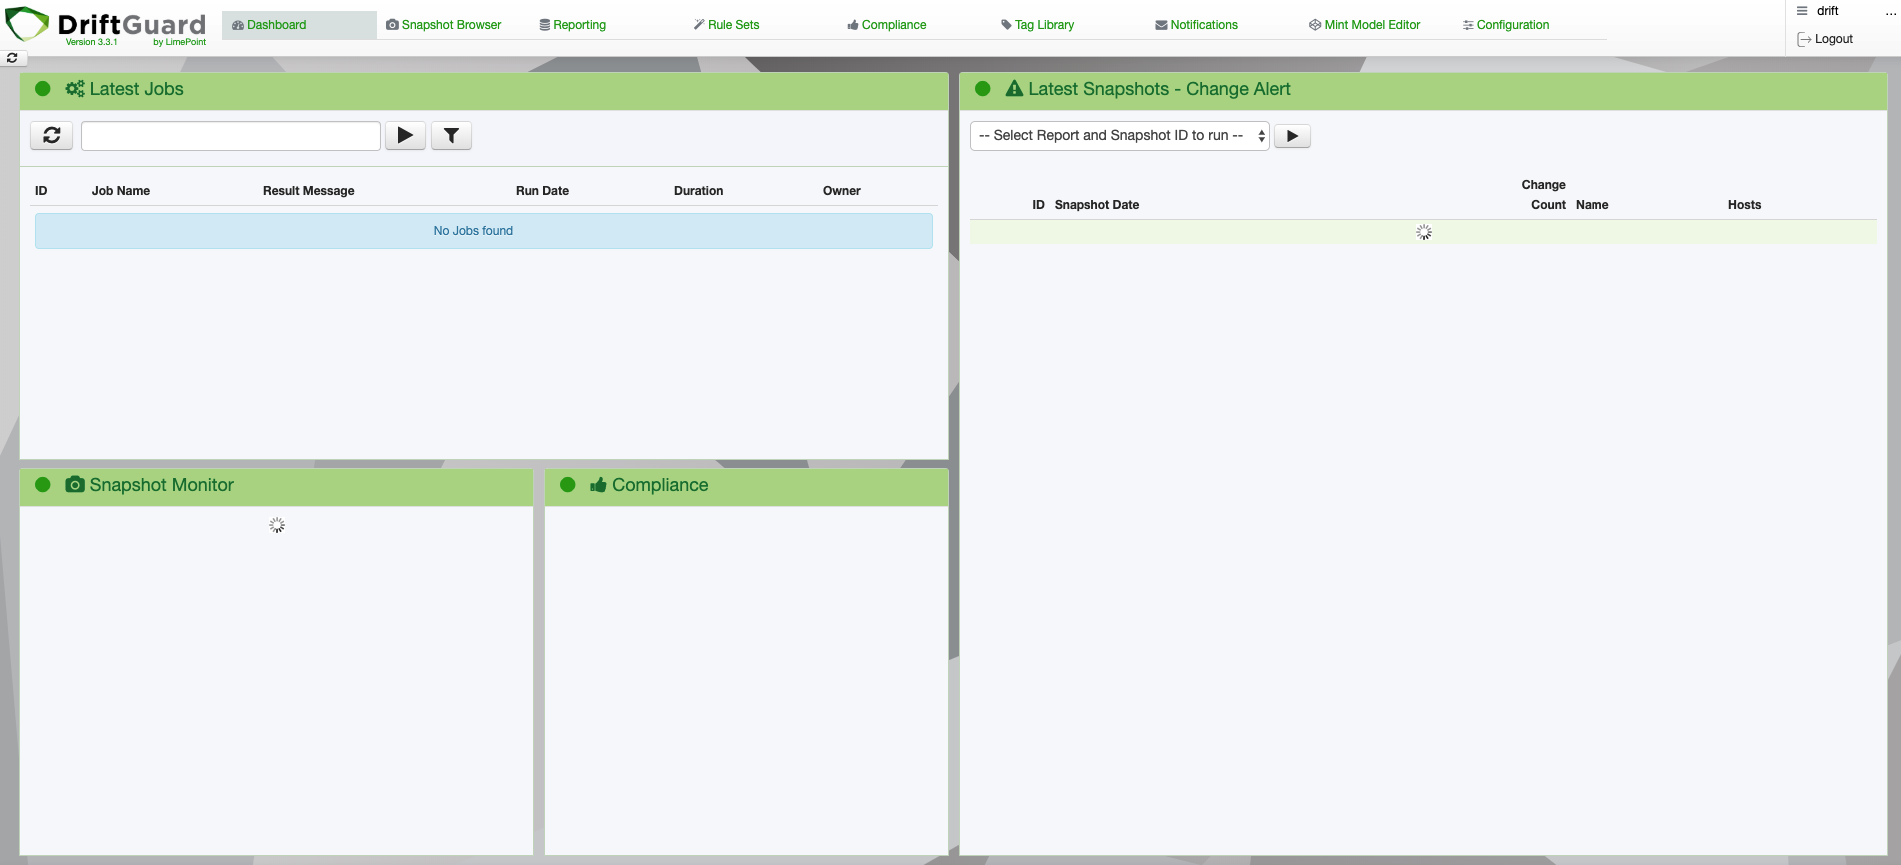
- Once a valid licence is uploaded, full access to the application is provided
Summary
The steps above demonstrate how quickly and simply the DriftGuard application can be installed in the AWS cloud. Depending on your company’s needs, a larger EC2 or RDS instance may be required, however, this is just a matter of selecting a different instance during your setup (or even dynamically modifying your instances at a later date).
An elastic IP is not strictly required, however, if you stop your DriftGuard instance at any time, AWS will allocate a new IP address when it is restarted, which will mean all of your target hosts will need to be updated to point to the new IP address. Having an Elastic IP address means that this will never be an issue.
From this point, configuration of the application is required to perform data collection against your target hosts. This is not covered in this post, however, is explained in great detail in the documentation, and may also be covered in a future post.
Please contact LimePoint directly if you have any enquiries relating to DriftGuard, and/or how to leverage the AWS cloud to quickly and simply get started with monitoring configuration drift at your site.